Holding the alt key and adjust the white slider, the preview screen will turn black when you are holding alt and have clicked on the white slider. When you move the selector far enough to the left, some of the pixels in the preview will change to white. This happens near the point where the histogram starts to rise. This is where I have the white slider set in the photo below. While adjusting the black slider, the preview window will turn white and eventually some of the pixels change black when you have made enough adjustment.
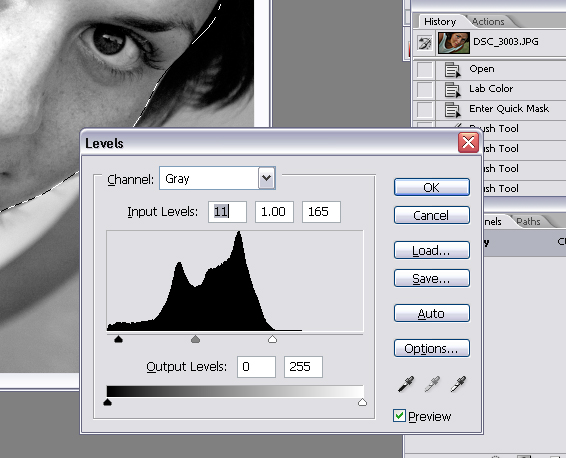
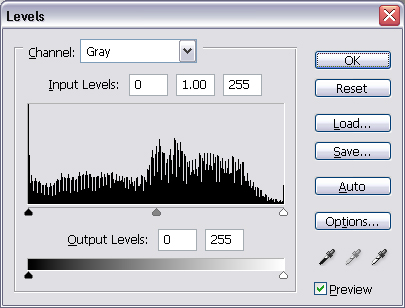
Often, black and white photos don't have pixels that are absolutely white or absolutely black. They are mostly muddy shades of grey. You can see in the histogram above that most of the pixels tend to be near the middle-to-left of the graph. This means that the brightest part of the photo is grey or black and there is almost no white. Using this tip stretches the histogram so that the right side of the graph goes all the way to being pure white and the left side makes it to absolute black. The idea is to have a range of black to white. See how the second histogram is different, how it isn't all clumped in the middle and reaches the edges.
The second tip is to help when there are parts of the photo that get washed out before you reach the desired contrast in other parts of the photo. For example, if a person is wearing a white shirt, it may become washed out before you get enough contrast in the face, but it looks much better if you have a range of white to black in the face as well as in the rest of the photo.
Edit different portions of the photo in more than one step and avoid changing the contrast or levels of the entire photo at the same time. This is a copy of the unedited photo.

By editing the photo in more than one portion you will get a more even contrast throughout the entire photo. In a portrait, it is generally a good idea divide the photo into at least two sections, the face and the rest of the picture. One thing to remember is that you don't want to add too much contrast and you do want to avoid washing out the highlights of the photo while making your edits. Often over editing makes things worse rather than improving the photo.
Here is the edited photo. If I had edited the levels or contrast of the entire photo, the detail in Tracie's shirt would have been lost because it is white. It would have become completely washed out before I was satisfied with the contrast of her face. This is very common problem. When I was working at the newspaper, I made this edit on *every single* black and white photo that we printed.

I'm happy with how this photo turned out, but another thing that could have been done would be to edit the hair separately. They way it is now, it looks much darker than it is in real life. Editing it separately would bring the high and lowlights to the forefront of the photo. It all depends what you want the finished product to convey.
-Gary Milner
1 comment:
Thanks GAR
Post a Comment