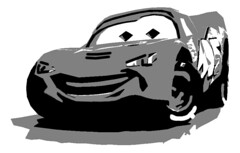
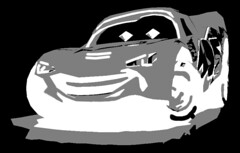
In anticipation of people searching for free pumpkin carving templates, I made this one from the pixar movie cars. This is the main character Lightning McQueen.
I inverted it to give you a better idea of what it will look like carved. I recommend printing the one with the white background, (it uses less ink). Just cut out the black part and peel the skin off the grey part.
You can click on the photos to get larger copies. You can get the full res version from my flickr account.
Here are 10 tips for carving a pumpkin:
1. Experiment with printing the template at different sizes in a photo editing program to best match the size of your pumpkin.
2. Use a pin or tack to make an outline of where you want to cut. Pinholes along the line to be cut make it easier to cut through the skin of the pumpkin and help you achieve a higher level of detail.
3. Don't follow the pattern too closely. Some of the parts you need to cut are a little too fine to be realistically carved. Massaging the pattern will make it more your own and it will turn out better anyway.
4. Don't skimp on the time transferring the pattern, extra work now pays off big time later.
5. In the grey area, peel the skin off and then shave the inside of the pumpkin to make portions brighter. This will allow a higher level of detail while leaving the curve of the pumpkin on the outside.
6. Use a sturdy knife. Wimpy ones always break.
7. Lay down tons of newspaper / garbage bags to catch the pumpkin guts. This will help with the clean up immensely.
8. Always carve with adult supervision. If you're an adult already, make sure there is a least one sober adult supervising.
9. Do not throw pumpkin guts or seeds.
10. Be very careful with the cutting instruments.
-Gary Milner


3 comments:
Very nice work. Thank you for posting this.
THANK YOU, THANK YOU, THANK YOU, THANK YOU, THANK YOU, THANK YOU, THANK YOU, THANK YOU, THANK YOU, THANK YOU, THANK YOU, THANK YOU, THANK YOU, THANK YOU, THANK YOU......and THANK YOU!
I am forever grateful and hope to get you a pic of the finished poduct before Halloween!
Thhank you for writing this
Post a Comment